Shooting of comets and other pieces
When your comet is landing an a square after your first or second partial move and this square is occupied by another piece, this piece on it will be shot.
So, in one SOLARI-move, you can also shoot two comets or planets and moons.
There are four kinds of shot:
Normal shot:
The shot comet (or other piece) must be set on a margin square, belonging to the same horizontal or vertical row of squares.
Aimed shot:
When you shoot only one adverse piece and you move only one own piece, you can set the shot comet (or other piece) on any not occupied margin square.
The piece can be shot in the first or in the second partial move, it doesn't matter. But own pieces cannot be shot with an aimed shot,
for own pieces is valid only the normal shot.
Total shot:
The condition is the same as for the aimed shot, but you need a double (e.g. 2-2).
The shot comet will be taken off the board and must be reentered by your opponent in his next move.
How does it work?
The two numbers on the dice determine the coordinates on the board, where the comet has to be reentered.
When, for example, you have rolled 5-2, you have two squares as an option, square 52 or 25.
If you roll a double, you have only one square (for example 33).
Self shot:
You may also shoot your own comets and other pieces, but in this case, it's always a normal shot.
If you shoot your own comet in the first partial move, you can move the shot comet in the second move.
Doing this you can reach more fields on the board.
Here some examples of the different kinds of shot:

Normal shot:
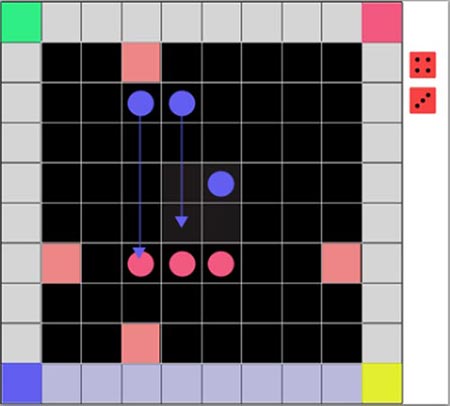
Uranus (blue) has rolled 4-3 and moves two comets.
One shoots with the rolled 4 the comet from the row of three from Neptune.
He moves the other comet with the rolled 3 and forms a row of three.
Because he has moved two pieces, it's the normal shot.
For this reason he must set the shot comet on one of the four marked squares.
When all of these squares happen to be occupied, he can set the comet on any other not occupied sqare.

Aimed shot:
We have the same position and the same rolled dice as in the example before.
Now Neptune decides to move only one comet and shoot the adverse comet after the first partial move.
Thus he fulfils the rule for an aimed shot and forms also a row of three, although in another spot of the board.
Now he can set the shot comet on any free margin square. That's clearly the better option,
because the opponent cannot bring back his comet to the initial position with one partial move.

Total shot:
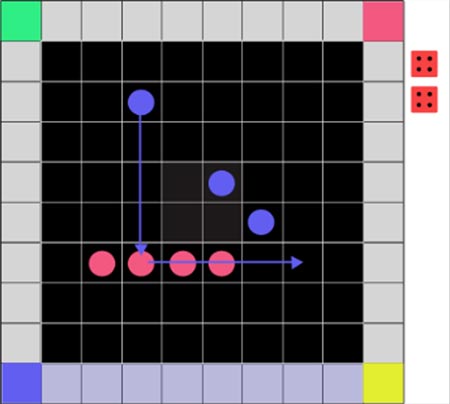
Uranus has rolled 4-4, a double.
He moves only one comet and shoots only one adverse comet. Thus the condition for a total shot is fulfilled.
He destroys Neptune's row of four effectively and creates a row of three at the same time.
Neptune must reenter the shot comet in his next move. To rebuilt the row of four he needs a 5-5.
The chances for this in 1:35, that's very low.

Self shot:
Uranus has rolled 4-3 and can extend his existing row of three to a row of four be shooting his own comet with the 3
and setting it lightblue margin square (he has for optional squares).
Now he moves his just shot comet with the 4 and shifts his newly built row of four to East.
Thus he gets a free margin square and threatens very strongly a row of five in his next move.
Besides he occupies three of the four center squares, which counts as another row of three.
The tactical possibilities of the four kinds of shot
The four kinds of shot make the SOLARI-game to a real tactical game.
You can influence the game heavily by choosing the right kind of shot.
Normal shot:
With this shot you don't disturb your opponent very much, because he can bring back his comet to the original position with one partial move.
But you can shoot two adverse comets, which can be quite effective.
Or you shoot the same adverse comet twice and thus take it to the corner of the board.
Sometimes all four margin squares are occupied, then you can set the shot comet to any free margin square.
You can even occupie the remaining margin square with your piece in the first move and shoot the adverse comet in the second move.
Aimed shot:
This shot is more effective than the normal shot, because you can choose the worst margin square for your opponent.
The disadvantage is the condition for the aimed shot.
Total shot:
This is by far the most effectful shot, because your opponent cannot make a normal SOLARI-move, but he has to reenter his comet.
Real bad luck for your opponent would be if he rolls 6-6 and he cannot move what he wants.
Even worse would be, if your blocker is standing on square 66. As he is not allowed to shoot your blocker, the whole move is forfeited.
But when one of your comets is on this field it would be a new total shot.
On any other non double reentering square, your comet is shot with an aimed shot.
Own pieces are always shot normally.
Self shot:
The self shot has two advantages: You don't block yourself and on the other hand you can set your comet (or other piece) on the most suitable margin square.
And you can move the self shot piece in the second move. So, you can even have two self shots in one SOLARI move.
And another option: If all margin fields are occupied, you can set your comet to any free margin square and build by this a new row.
More tactical possibilities:
To disturb your opponent you don't need a shot in any case.
Often it is more effective, to force your opponent to destroy you by threatening a high score in the next move.
But always consider, what your opponent can reach in his next move and how the chances are.
You should be very careful, if your opponent trhreatens a row of five. The earlier you disturb him, the better.
Unfortunately you depend on your rolled dice. Sometimes you can only limit the harm and hope for a better roll in the next move.
A real perfidious manner to disturb your opponent is to built a row for your opponent, which he cannot extend, because only those rows are counted,
which are built by himself.